Frozen Raspberry Cheesecake Bites Recipe
Cheesecake has long been a beloved dessert, captivating palates with its rich, creamy texture and diverse flavor profiles. Among the myriad variations of this classic treat, bite-sized desserts have carved out a niche that appeals to many. They offer the perfect balance of indulgence and moderation, allowing you to savor the flavors without the commitment of a full slice. Enter Frozen Raspberry Cheesecake Bites: a refreshing, easy-to-make dessert that is particularly perfect for warm weather or casual gatherings. With a delightful blend of creamy cheesecake, tart raspberries, and a crunchy graham cracker crust, these bites promise to be a hit at any occasion.
The Allure of Frozen Desserts
Frozen desserts hold a special place in the hearts of dessert lovers. Their refreshing quality provides an ideal antidote to warm summer days, making them an excellent choice for outdoor parties, picnics, or simply a treat after a long day. One of the key benefits of frozen desserts is their ease of preparation. Once assembled, they can be stored in the freezer until it’s time to serve, allowing you to prepare ahead of time without the stress of last-minute cooking.
The versatility of frozen desserts is another appealing factor. Whether you’re hosting a casual family gathering or an elegant dinner party, these treats can easily adapt to fit the occasion. Miniaturized desserts like Frozen Raspberry Cheesecake Bites not only offer a delightful burst of flavor in each bite but also enhance the visual appeal of your dessert table. Their aesthetic presentation, often arranged beautifully on platters or in individual servings, makes them a crowd-pleaser that is both delicious and visually stunning.
Ingredients Overview
Creating the perfect Frozen Raspberry Cheesecake Bites requires a selection of quality ingredients that contribute to the overall flavor and texture of the dessert. Let’s delve into each component of this delightful recipe.
– Graham Cracker Crumbs: The foundation of the crust, graham cracker crumbs provide a satisfying crunch that complements the smoothness of the cheesecake. Their mildly sweet flavor pairs beautifully with the tartness of the raspberries, creating a balanced bite.
– Unsalted Butter: When baking, it’s essential to use unsalted butter for better flavor control. This allows you to manage the overall salt content in the recipe while ensuring that the buttery richness shines through without overpowering the other flavors.
– Cream Cheese: As the cornerstone of the cheesecake filling, cream cheese provides the rich and creamy texture that is synonymous with cheesecake. Its tangy flavor adds depth, making it an essential component that brings the dessert to life.
– Powdered Sugar: Unlike granulated sugar, powdered sugar dissolves easily, contributing to a smoother, creamier texture in the cheesecake filling. This fine sugar helps to achieve the perfect consistency without any gritty or grainy mouthfeel.
– Vanilla Extract: A splash of vanilla extract enhances the flavor profile of the cheesecake, adding warmth and complexity to the overall taste. It complements the sweetness of the sugar and the tartness of the raspberries beautifully.
– Raspberries: These vibrant berries not only add a burst of color but also provide nutritional benefits, such as antioxidants and vitamins. You can choose between fresh or frozen raspberries, depending on your preference and availability. Fresh berries add a bright, juicy flavor, while frozen raspberries can be more convenient and equally delicious.
– Fresh Lemon Juice: A crucial ingredient that balances the sweetness of the cheesecake and the tartness of the raspberries, fresh lemon juice adds a zesty brightness that elevates the overall flavor.
– Salt: A pinch of salt enhances the flavors in the cheesecake, rounding out the sweetness and bringing the other flavors into harmony. It’s a small but vital addition that makes a noticeable difference.
– Dark Chocolate (optional): For those looking to add a gourmet touch, a drizzle of dark chocolate can elevate the dessert to new heights. The richness of the chocolate pairs wonderfully with the tart raspberries, creating a decadent combination that is hard to resist.
Step-by-Step Instructions
Preparing the Crust
The first step in crafting your Frozen Raspberry Cheesecake Bites is preparing the graham cracker crust. This crust forms the foundational layer of the dessert, providing a satisfying crunch that contrasts beautifully with the creamy filling. Begin by gathering your graham cracker crumbs and unsalted butter, which will serve as the binding agent for your crust.
1. In a mixing bowl, combine the graham cracker crumbs and melted unsalted butter. The key here is to ensure that the butter is evenly distributed throughout the crumbs. You want a mixture that resembles wet sand—moist enough to hold together when pressed, yet crumbly enough to provide texture.
2. Use a fork or your hands to mix the graham cracker crumbs and melted butter thoroughly. Take your time with this step; achieving the right consistency is crucial. If the mixture is too dry, it won’t hold together well, leading to a crust that crumbles when you bite into it. Conversely, if it’s too wet, the crust may become soggy once frozen.
3. Once you have the perfect mixture, press it firmly into the bottom of a lined baking dish or mini muffin tin. Use the back of a measuring cup or your fingers to pack it down evenly, ensuring a solid base for your cheesecake layer. The goal is to create a crust that is sturdy enough to support the filling while still maintaining a delightful crunch.
By following these initial steps, you set the stage for an irresistible dessert that combines the richness of cheesecake with the refreshing taste of raspberries. As you move forward in this recipe, you’ll soon discover how simple it is to create these delightful Frozen Raspberry Cheesecake Bites, perfect for sharing or enjoying all on your own.
{{image_2}}
Pressing the Crust
To create a solid foundation for your Frozen Raspberry Cheesecake Bites, start by lining a muffin tin with cupcake liners. This will not only make it easier to remove the cheesecake bites after freezing, but it also helps maintain their shape. Begin by cutting parchment paper into squares that are slightly larger than the muffin cups. Place these squares into each cup, pressing them down gently to form a liner.
Next, to achieve an evenly compact crust, mix your graham cracker crumbs with melted butter and sugar until the mixture resembles wet sand. Use a tablespoon or your fingers to evenly distribute the crumb mixture into each lined muffin cup. Press down firmly with the back of a measuring cup or your fingers to ensure that the crust is tightly packed. A well-pressed crust is crucial as it holds up during the freezing process and prevents the cheesecake filling from seeping through.
Tips for Achieving a Compact Base
– Ensure that the butter is fully melted and evenly mixed with the crumbs.
– Apply consistent pressure while pressing down the crumbs to avoid any air pockets, which can lead to a crumbly texture after freezing.
– Consider placing the muffin tin in the fridge for about 10-15 minutes after pressing the crust. This will help the butter solidify and contribute to a firmer crust.
Making the Creamy Filling
Now, it’s time to prepare the creamy filling that will be the star of your cheesecake bites. Start by allowing the cream cheese to sit at room temperature for about 30 minutes before you begin. This step is crucial because softened cream cheese blends more easily, resulting in a smooth and lump-free filling.
Using a hand mixer or stand mixer, beat the softened cream cheese in a large mixing bowl until it’s creamy and smooth. Gradually add the powdered sugar, vanilla extract, and lemon juice. Continue mixing until the ingredients are well incorporated, and the mixture is light and fluffy.
Why Temperature Matters for Cream Cheese
Cream cheese that’s too cold can result in a lumpy filling, as it won’t blend smoothly. Conversely, if it’s too warm, it may become overly soft, affecting the final texture of your cheesecake bites. Striking the right balance is key to achieving that perfect creamy consistency.
Incorporating Raspberries
With the filling ready, it’s time to add the star ingredient: fresh raspberries. Gently fold in the raspberries with a spatula. It’s essential to handle the raspberries with care to avoid crushing them completely. You want to maintain their shape for both visual appeal and texture.
Suggestions for Achieving the Perfect Balance of Raspberry Flavor
– Aim for about 1 to 1.5 cups of raspberries, depending on your preference for fruitiness. This amount allows for a pronounced raspberry flavor without overwhelming the cheesecake.
– For a more uniform raspberry flavor throughout the filling, consider mashing a portion of the raspberries while keeping some whole for that beautiful marbled effect.
Filling the Crusts
Now that your filling is ready, it’s time to fill the muffin cups. Use a spoon or a small ice cream scoop to add the cheesecake filling to each crust. Aim to fill each cup generously but avoid overfilling to prevent spillage during freezing.
Visual Cues for Properly Filled Cups
– The filling should reach just below the top of the crust, as the bites will expand slightly during freezing.
– A well-filled cup will have a smooth, rounded top, indicating that you’ve achieved the right amount of filling.
Freezing Process
Once the muffin cups are filled, it’s time to freeze your cheesecake bites. Place the muffin tin in the freezer and allow them to freeze for at least 4-6 hours, or until completely solid. This freezing time is vital to achieving the right texture; the cheesecake bites should be firm enough to hold their shape when removed from the tin.
Importance of Ensuring Solidification
Freezing ensures that the cheesecake bites are easy to handle and won’t melt into a gooey mess when served. If you’re short on time, you can check for doneness by gently pressing the center of a cheesecake bite with your finger. If it feels solid and bounces back, they’re ready to enjoy.
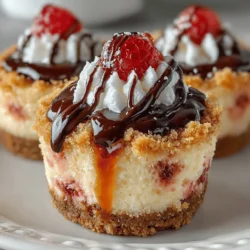
Adding a Chocolate Drizzle (Optional)
For an added touch of elegance and flavor, consider drizzling melted chocolate over your frozen cheesecake bites. To do this, start by melting chocolate chips in a microwave-safe bowl in 30-second intervals, stirring in between until fully melted and smooth.
Techniques for Drizzling Elegantly
– Once melted, let the chocolate cool slightly before drizzling. This will help it set upon contact with the cold cheesecake.
– Use a fork or a piping bag with a small tip to create a beautiful drizzle over each cheesecake bite. The contrast of the dark chocolate against the white filling and pink raspberries creates a stunning visual.
Visual and Taste Benefits of Adding Chocolate
The rich flavor of chocolate complements the tartness of the raspberries beautifully, adding another layer of taste to your bites. Additionally, the glossy chocolate drizzle enhances the overall presentation, making them perfect for gatherings and special occasions.
Serving Suggestions
When it’s time to serve your Frozen Raspberry Cheesecake Bites, allow them to sit at room temperature for about 5-10 minutes before serving. This brief thawing helps soften the exterior, making them easier to bite into while keeping the center perfectly chilled.
Tips for Removing the Bites from the Tin
– Gently peel away the parchment liners to avoid damaging the cheesecake bites. If they resist, you can run a small knife around the edges to loosen them before pulling them out.
– To enhance the presentation, consider placing the bites on a decorative platter and garnishing them with fresh raspberries and mint leaves.
Presentation Ideas for Gatherings
– Arrange the cheesecake bites on a tiered dessert stand for an impressive display.
– Drizzle additional chocolate and sprinkle some crushed graham crackers over the top for added texture and visual appeal.
Conclusion
Making Frozen Raspberry Cheesecake Bites is a delightful experience that combines the tangy flavor of raspberries with the rich creaminess of cheesecake. This recipe not only pleases the palate but also caters to various tastes and occasions, from casual family gatherings to elegant parties.
The versatility of this recipe means you can easily adapt it for different fruits or toppings, ensuring that you can enjoy these delightful treats any time of year. We encourage you to try out this recipe and share your experiences with friends and family. There’s nothing quite like the joy of creating homemade treats that bring smiles to those you love. Enjoy the process and the delicious results!