Oreo Delight No-Bake Bars Recipe: A Decadent Dessert Without the Oven
Introduction
In the world of desserts, no-bake recipes hold a special place. They offer a delightful combination of convenience and indulgence, making them a favored choice for busy home bakers and dessert enthusiasts alike. Whether you’re planning a summer gathering, a birthday celebration, or simply a sweet treat for a cozy night in, no-bake desserts like the Oreo Delight No-Bake Bars stand out as the perfect solution. These bars encapsulate the rich, chocolaty goodness of Oreo cookies combined with a luscious, creamy filling, appealing to anyone with a sweet tooth.
What makes Oreo Delight No-Bake Bars particularly enticing is their simplicity. With minimal ingredients and no need for an oven, this recipe is accessible for bakers of all skill levels, from novices to seasoned pros. The straightforward nature of the preparation allows you to whip up a batch in no time, making them an ideal choice for last-minute occasions or when you’re simply craving a delicious dessert without the hassle of baking.
The Allure of No-Bake Desserts
The charm of no-bake desserts lies in their quick preparation. Unlike traditional baking, which requires heating an oven and often dealing with complex timing and temperatures, no-bake treats can be prepared in a matter of minutes. This efficiency is especially appealing during warm weather when the last thing you want is to crank up the oven and heat your kitchen.
No-bake desserts are incredibly versatile, fitting seamlessly into various occasions—from casual picnics to elegant dinner parties. They can be made in advance, allowing flavors to meld and intensify over time, which is a lovely bonus for hosts and hostesses. Moreover, these desserts often lend themselves to creative adaptations, making it easy to customize them according to personal tastes or dietary preferences.
Ingredients Overview
To create your own batch of Oreo Delight No-Bake Bars, you’ll need a handful of simple yet essential ingredients that work together to produce a mouthwatering dessert.
– Oreo cookies: The star of this recipe, Oreo cookies provide both the base flavor and texture. Their chocolatey, cream-filled goodness is what makes these bars so irresistible.
– Unsalted butter: Used to bind the crust, unsalted butter adds richness and moisture to the Oreo cookie base, ensuring it holds together perfectly.
– Cream cheese: A key component of the filling, cream cheese contributes a rich and creamy texture. It balances the sweetness of the other ingredients while adding a subtle tang.
– Powdered sugar: This ingredient sweetens the filling and contributes to its smooth, velvety consistency. Unlike granulated sugar, powdered sugar dissolves easily, preventing any graininess in the final product.
– Vanilla extract: A staple in many dessert recipes, vanilla extract enhances the overall flavor profile, adding a warm and aromatic quality that complements the chocolate and cream cheese beautifully.
– Whipped cream: To lighten the filling and create a fluffy texture, whipped cream is folded into the mixture. This step adds an airy quality that contrasts nicely with the dense chocolate crust.
– Chocolate chips: For a decorative and delicious drizzle, chocolate chips are melted and drizzled over the top of the bars. This not only enhances the appearance but also adds an extra layer of chocolatey goodness.
Step-by-Step Instructions
Now that we have familiarized ourselves with the ingredients, let’s dive into the step-by-step process for creating these delectable Oreo Delight No-Bake Bars. This straightforward approach ensures you can enjoy this delightful treat with ease.
Step 1: Prepare the Oreo Crust
Begin by crushing the Oreo cookies into fine crumbs. You can achieve this by placing the cookies in a resealable plastic bag and using a rolling pin to crush them, or by pulsing them in a food processor. Once you have a fine crumb consistency, transfer the crumbs into a mixing bowl.
Next, melt the unsalted butter in a microwave-safe bowl or on the stove. Once melted, pour the butter over the Oreo crumbs. Mix thoroughly until the crumbs are evenly coated and the mixture resembles wet sand. This will form the base of your no-bake bars.
Press the mixture firmly into the bottom of a lined baking dish, creating an even layer. Use the back of a measuring cup or your hands to pack it down tightly. This step is crucial for ensuring that the crust holds its shape once the bars are set.
Step 2: Prepare the Creamy Filling
In a separate mixing bowl, beat the cream cheese until smooth and creamy. This can be done using an electric mixer or a whisk, depending on your preference. Once the cream cheese is well-blended, gradually add the powdered sugar, mixing until fully incorporated and smooth.
Next, add the vanilla extract to the cream cheese mixture. This step enhances the flavor, making it even more indulgent. Once well mixed, gently fold in the whipped cream. Be careful not to deflate the whipped cream; you want to maintain that light and airy texture. The result should be a rich, fluffy filling that will complement the Oreo crust perfectly.
Step 3: Assemble the Bars
Spread the cream cheese filling evenly over the prepared Oreo crust in the baking dish. Use a spatula to smooth the top, ensuring an even layer that will set beautifully. Once the filling is in place, it’s time to chill the bars.
Cover the baking dish with plastic wrap or aluminum foil and place it in the refrigerator. Allow the bars to chill for at least 4 hours, or overnight for the best results. Chilling is essential as it helps the filling firm up and makes cutting the bars easier.
Step 4: Add the Chocolate Drizzle
Once the bars have set, it’s time to add the finishing touch. Melt the chocolate chips in a microwave-safe bowl, stirring every 30 seconds until smooth and fully melted. Allow the melted chocolate to cool slightly before drizzling it over the top of the chilled bars. You can do this using a spoon or by placing the melted chocolate in a piping bag for a more controlled drizzle.
After decorating with chocolate, return the bars to the refrigerator for an additional 30 minutes to set the drizzle. Once the chocolate has hardened, your Oreo Delight No-Bake Bars are ready to be sliced and served.
With this detailed introduction and initial steps, you’re well on your way to creating a dessert that will impress your friends and family with its delicious flavor and effortless preparation. Enjoy the process, and get ready to indulge in the rich taste of these delightful bars!
{{image_2}}
Preparing the Pan
Lining your baking pan with parchment paper is an essential step in preparing for your Oreo Delight No-Bake Bars. This simple yet crucial technique ensures that your dessert can be easily removed from the pan once set, allowing for a clean cut and an impressive presentation. To line your pan, cut a piece of parchment paper that fits the bottom of your dish and extends slightly over the sides. This overhang acts as handles, making it easier to lift the bars out without damaging them. A properly lined pan not only helps with removal but also minimizes the mess, making cleanup a breeze.
Creating the Oreo Crust
The crust is the foundation of your Oreo Delight No-Bake Bars, and it begins with crushing the Oreos. Place the Oreos in a food processor or a resealable plastic bag and crush them into fine crumbs. If using a bag, a rolling pin works great for this task. You want the crumbs to be consistent and fine to ensure a smooth crust.
Once you have your Oreo crumbs, transfer them to a mixing bowl and add melted butter. The butter acts as a binding agent, holding the crust together. Mix the crumbs and butter until fully combined; the mixture should resemble wet sand.
Next, it’s time to press the mixture firmly into the bottom of your prepared pan. Use a flat-bottomed measuring cup or your fingers to pack the crust tightly. A well-compressed crust will create a stable base and prevent it from crumbling when you cut the bars later. Aim for an even thickness throughout, ensuring that every bite has that delightful Oreo crunch.
Crafting the Creamy Filling
The creamy filling is where the magic happens in your Oreo Delight No-Bake Bars. Start by beating softened cream cheese in a large mixing bowl until it is smooth and creamy. This step is crucial as it creates the base for your filling. Next, gradually add powdered sugar and vanilla extract while continuing to mix. The powdered sugar not only sweetens the filling but also contributes to its overall texture. Be sure to scrape down the sides of the bowl to ensure everything is well incorporated.
Once the sugar and vanilla are fully mixed in, it’s time to fold in the whipped cream. This is a vital step, as gently folding the whipped cream into the cream cheese mixture helps maintain a light and airy texture. Use a spatula to carefully combine the two mixtures, taking care not to deflate the whipped cream. The result should be a luscious, fluffy filling that will perfectly complement the Oreo crust.
Assembling the Dessert
With both the crust and filling prepared, it’s time to assemble your Oreo Delight No-Bake Bars. Start by pouring the creamy filling over the crust in the lined pan. Using an offset spatula or the back of a spoon, smoothly spread the filling evenly over the crust, ensuring there are no gaps. The visual appeal of your layers is important; a well-layered dessert looks as good as it tastes.
Once the filling is spread evenly, use the spatula to create a smooth top. This finishing touch will make your bars even more inviting once they are set and ready to serve.
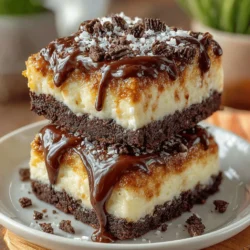
Adding the Crunchy Topping
To enhance both flavor and texture, it’s time to prepare the crunchy topping. Take a few more Oreos and crush them into coarse crumbs, similar to how you prepared the crust. Sprinkle the crushed Oreos generously over the top of the creamy filling. This not only adds a delightful crunch but also visually complements the creamy layer beneath.
Distributing the Oreo crumbs evenly will ensure that every bite of your bars is packed with that signature Oreo flavor. Feel free to adjust the amount of topping based on your personal preference—more crumbs mean more crunch!
Setting the Bars
Now that your bars are assembled with their layers, it’s crucial to allow them to set properly in the refrigerator. Cover the pan with plastic wrap or aluminum foil and refrigerate for at least four hours, although overnight is even better. This setting time allows the flavors to meld and the filling to firm up, making it easier to cut into perfect squares without compromising the structure.
While waiting, you can use this time to clean up your kitchen and plan how you’ll serve your delicious creation!
Final Touch: Chocolate Drizzle
To elevate your Oreo Delight No-Bake Bars even further, consider adding a chocolate drizzle. Melt chocolate chips in a microwave-safe bowl in 30-second intervals, stirring after each session until smooth. Alternatively, you can use a double boiler if you prefer.
Once melted, transfer the chocolate to a piping bag or a sandwich bag with a corner snipped off. Drizzle the melted chocolate elegantly over the chilled bars, creating a beautiful pattern on top. This rich chocolate layer not only enhances the visual appeal but also adds an extra layer of flavor that complements the Oreos perfectly.
Serving Suggestions
When it comes to serving your Oreo Delight No-Bake Bars, presentation matters. Carefully lift the bars out of the pan using the parchment paper handles, and place them on a decorative platter. For an extra touch, consider dusting the top with a light sprinkle of cocoa powder or additional crushed Oreos.
You can also serve the bars with a side of extra chocolate sauce for dipping, allowing guests to indulge even more. These bars are perfect for parties, family gatherings, or simply as a delightful treat for yourself. Their no-bake nature makes them a quick and easy dessert option that everyone will love.
Conclusion
Making Oreo Delight No-Bake Bars is not only easy but also incredibly satisfying. The combination of creamy filling, crunchy Oreo crust, and decadent chocolate drizzle creates a dessert that is sure to impress. Whether you’re hosting a party or just looking for a sweet treat to enjoy at home, these bars are a delightful choice that caters to all occasions. So gather your ingredients, follow the steps, and indulge in the deliciousness of this no-bake dessert. Your taste buds will thank you!